
Those movements are the overhead press (also known as the strict press), push press, push jerk, air squat, front squat, overhead squat, deadlift, sumo deadlift high pull, and medicine ball clean.
Therefore, one of the foundations of building a strong upper body as a CrossFit athlete is the overhead press.
A strong shoulder press will translate to performance gains across the board in your workouts, and will also develop a more muscular physique for your upper body.
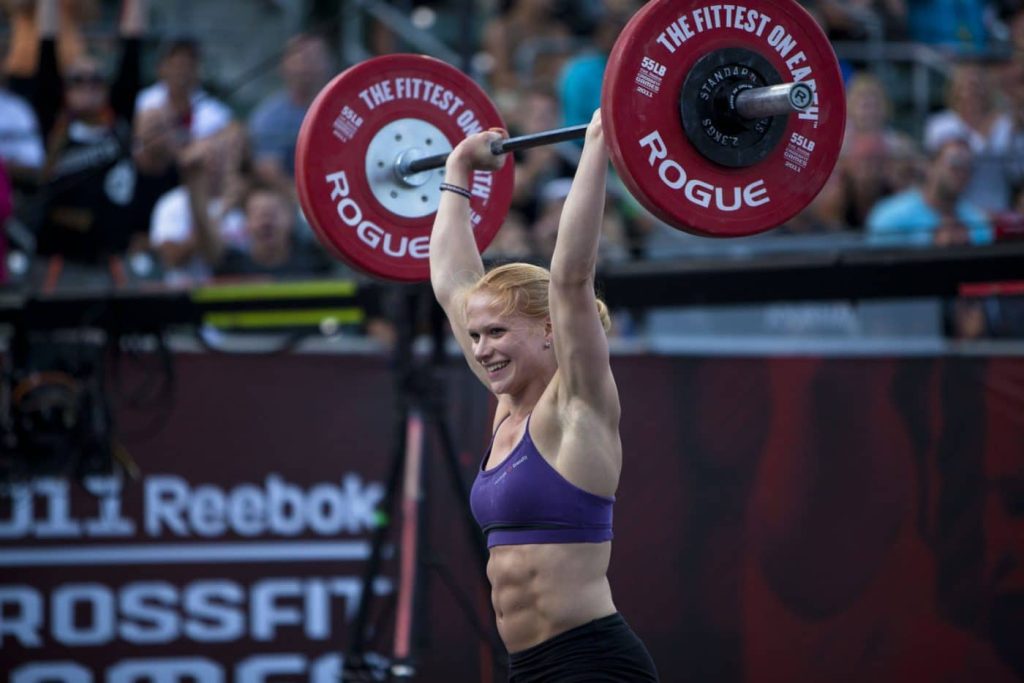
The shoulder press is a compound movement that involves lifting a loaded barbell from your shoulders to a locked out position overhead.
This article will walk you through how to shoulder press, the benefits, and how to incorporate the shoulder press into your routine (including alternatives if you’re injured or want to train other muscle groups).
Let’s get started.
The Overhead Press: How It’s Done
The overhead press can be broken down into 3 parts: the grip, the setup, and press.
The bolded word in quotes at the beginning of each bullet is the actual coaching cue you can use with your athletes.

Grip
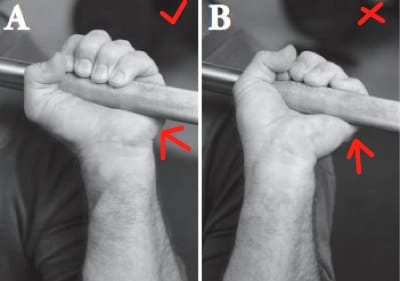
“Shoulder width grip” – Grip the bar with your hands shoulder-width apart. An easy way for most people is to have their thumbs line up with the start of knurling (grippy part).
Setup
“Feet under hips” – knees and hips should be locked out throughout the entire movement. While the push press and push jerk utilize the lower body muscles for power, the shoulder press does not.
“Elbows down” – while the bar is resting on your shoulders, your elbows should not be as high as up as they would be during a front squat. Keep your elbows down.
Think about it like this: you’re moving the bar vertically, so you want your forearms to be positioned more vertically.
Press
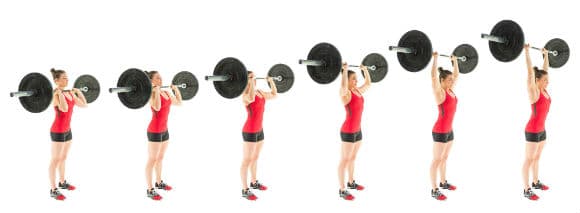
“Press” – you initiate the press by moving your head out of the way and pressing the bar overhead. Once the bar reaches the top, drive your head through to finish.
The bar should finish in one straight line with your hips and feet, and your knees and elbows should be locked out.
Optional
“Tight belly, tight butt” – in my years in coaching, I’ve found that many new athletes focus too much on their upper body and forget about their core.
It took years of shoulder pressing myself to realize just how important your lower body and core are for increasing numbers.
This cue was born from these experiences. When I start pushing the bar overhead (the “press” cue), I think or say “tight belly, tight butt”. For me, this ensures that from the ground up, I am generating force to get the bar locked out overhead.
If you’d like to see coaching points of performance for the push press and push jerk, check out this video.
Common Faults/Correctives
Over Extended Spine – new or weaker athletes will compensate by leaning back as they press overhead.
Use the cue “ribs down” to fix this, as the rib cage flares out in an over-extended position.
Not moving the chin back – the bar cannot travel in a straight line if your chin doesn’t get out of the way.
If it did, it would hit the athlete in the face. Correct this by showing the athlete how the bar traveling out of a straight line.
Relaxed core – A relaxed core can lead“Tight belly, tight butt” will take care of this.
Dropping the bar too low when returning to the shoulders- you will be able to tell when an athlete does this because it’s going to feel uncomfortable for them.
Catching the barbell in a dip– it’s very common in CrossFit to see an athlete shoulder pressing and catching the bar while dipping your knees.
This is probably developed when they begin doing push presses during a workout for time, when they attempt to string reps together quickly.
A correct shoulder press finishes exactly how it starts- with hips underneath the feet and locked out knees.
Benefits of the Strict Press
The shoulder press is how you will develop a strong upper back, shoulders, and arms. But believe it or not, shoulder pressing requires an athlete to fully engage their core in order to do it correctly.
As such, overhead movements are a great way to develop a strong midsection.
Specific to Crossfit, the shoulder press will obviously increase one’s ability to move a heavy barbell overhead. But many of CrossFit’s key movements will be easier as well.
Some CrossFit movements that benefit from having strong shoulders (and an increased shoulder press) include:
- Push press
- Push jerk
- Wallballs
- Thrusters
- Snatch
- Pull-ups
- Muscle-ups
What To Expect (Gains In Performance)
Most coaches will say that you can push press 30% more weight than you can shoulder press, and push jerk 30% more than you can push press.
So an athlete that can shoulder press 100lbs can expect to push press about 135lbs and push jerk about 170lbs.
This is not guaranteed, but a rough framework you can work from.
While training each specific movement will lead to the most gains over time, you can expect all three overhead movements to increase when you start shoulder pressing more.
How To Incorporate Into Your Routine
You now understand what to look for when shoulder pressing and the benefits of doing it regularly. Let’s take a look at how you might incorporate it into your routine.
What’s The Goal?
First, let’s discuss what you should be shooting for with the shoulder press.
Exercise is about achieving milestones, after all. So what’s a good goal to set for the shoulder press for any athlete?
When an athlete can shoulder press their body weight, they have reached a pretty serious milestone. No matter where you start, this is likely a lofty but achievable goal.
Now, let’s go over 3 specific protocols you can add to your training that will lead to increased strength and muscle gains so that you can start working towards a bodyweight press.
Linear Progression
The simplest way to increase your shoulder press strength is to do it every week, adding a little bit more weight than you did the week before.
This is called a linear progression, and typically follows a 3×5 (3 sets by 5 repetitions) protocol. Start with about 85% of your perceived 1 rep max.
EMOM
Unless you can shoulder press over 200lbs, adding 7-minutes is an easy way to increase your numbers.
Pick the same day each week and do a 5 to 7 minute EMOM (every-minute-on-the-minute) style workout before or after the class WOD.
Shoot for between 25-45 repetitions at a weight that’s manageable, but challenging. Somewhere between 70-75% should be a good place to start. Do this for 4-6 weeks, adding 2.5-5lbs per week to the bar until you can no longer progress.
Failure Training (All 3 Overhead Movements)
One way to really add strength (and muscle) to your upper body is to use failure training with all 3 overhead CrossFit exercises: the shoulder press, the push press, and the push jerk.
Pick a weight you can shoulder press 5-7 reps with.
The rep before you think you will fail the next press, switch to the push press. Using your legs to drive the bar overhead, you should be able to then crank out at least 3-4 more reps, if not more.
Once you approach failure with the push press, switch to the push jerk, dropping below the bar and finishing each rep locked out at the knees and elbows.
Think of this as one giant set. The bar does not go back in the rack between movements. Shoot for 12-20 reps in a set (any less than 12 and the weight is too heavy) and try to add reps using that same next week.
Be careful with this protocol, as it’s high volume and intense. Done correctly, your shoulders will be incredibly fatigued at the end of a set.
Unlike the other protocols, I’d recommend only doing between 1-2 sets after your normal workout. You can probably still do it every week, but take a week off after 3-4 consecutive weeks.
Alternative Exercises
If you have injuries that prevent you from shoulder pressing a barbell overhead, consider these alternatives. Any of these movements can be substituted for the protocols listed above.
Dumbbell or Kettlebell presses – with dumbbells and kettlebells, you can take a more neutral grip on the bar. Instead of having your wrists facing forward, your pinky finger faces forward, which decreases the load on your shoulders.
Seated Press – called a “military press” by some, this might be a good assistance exercise/teaching method to ensure you aren’t using your legs for power when shoulder pressing.
Incline Bench Press – the incline bench press will use more chest than shoulders, but it’s a good compromise. Incline bench pressing is a great way to increase muscle hypertrophy in the chest, as well.
1-Arm Presses – a fantastic alternative or assistance exercise, the 1-arm press adds the benefit of stabilizing your body in a different way, using your obliques to keep your torso upright as you press from one side of the body.
Conclusion
The shoulder press is 1 of 9 foundational movements to the sport of CrossFit.
While strict pressing will develop your upper body muscles and make you better at moving a heavy barbell, it will lead to performance gains for other movements as well.
The shoulder press is learned in 3 phases: the grip, the setup, and the press. Stay tight, get your chin out of the way, and lock the bar out overhead.
Depending on how your gym programs, you can easily plug in a short routine each week to develop shoulder strength and increase your press numbers.
A good goal that anyone can achieve with hard work is a bodyweight shoulder press. This will be challenging, but with regular practice, is attainable.